
Have you noticed unsightly scratches marring the sleek surface of your induction hob? Don’t worry – we’ve got you covered! In this comprehensive guide, we’ll walk you through the step-by-step process of how to clean scratches off induction hob. Say goodbye to those pesky marks and restore your cooktop to its former glory in no time!
Common Causes of Scratches on Induction Hobs
Induction hobs are a modern kitchen marvel, but they’re not immune to scratches. One common cause of scratches is using the wrong type of cookware – rough-bottomed pots and pans can leave marks on the glass surface. Another culprit is sliding or dragging heavy cookware across the hob instead of lifting it. Even tiny bits of debris stuck between the hob and your cookware can lead to scratching as well.
Cooking with abrasive materials like sandpaper-like scouring pads or harsh chemicals on your induction hob can also contribute to scratches over time. Storing heavy items on top of the hob when not in use may inadvertently scratch it too. It’s essential to be mindful and gentle when handling your induction hob to prevent unnecessary wear and tear.
Step-by-step Guide on How to Clean Scratches Off Induction Hob
Remember, maintaining the pristine look of your induction hob is crucial to keeping it functioning at its best. By following these simple steps and being proactive in preventing scratches, you can ensure that your induction hob remains a shining centrepiece in your kitchen for years to come. So, roll up your sleeves and get ready to give your induction hob the TLC it deserves!

Gathering Necessary Materials
When it comes to cleaning scratches off your induction hob, having the right materials is key. Before you begin this task, make sure you have gathered all the necessary items to ensure a successful outcome.
Start by getting your hands on some mild cleaners like dish soap, baking soda, or vinegar. These gentle options are perfect for treating light scratches without causing further damage.
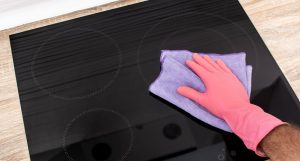
You’ll also need soft cloths or microfiber towels to apply the cleaners and buff out the scratches gently. Avoid using abrasive sponges or harsh chemicals that could worsen the situation.
For deeper scratches, consider investing in specialized ceramic cooktop cleaner or polish. These products are designed to tackle tough marks while being safe for use on induction hobs.
Having these materials at your disposal will make the scratch-removal process smoother and more effective. Remember to always follow safety precautions and manufacturer guidelines when cleaning your induction hob.
Assessing the Severity of the Scratches
When it comes to dealing with scratches on your induction hob, the first step is to assess how severe they are. Take a close look at the scratches and determine whether they are light surface marks or deep gouges. Light scratches may appear as thin lines that have not penetrated the glass surface deeply, while deep scratches will be more prominent and feel rough to the touch.
Run your fingers over the scratched area to feel for any indentations or rough spots. If the scratch catches your fingernail, it’s likely a deeper one that will require more intensive cleaning methods. Additionally, inspecting the scratch under different lighting conditions can also help you gauge its severity.
By carefully assessing the severity of each scratch on your induction hob, you’ll be better equipped to choose the appropriate cleaning techniques and products needed to restore its appearance. Remember that proper evaluation is key in determining how best to tackle those pesky scratches!
Using Mild Cleaners and Techniques for Light Scratches
Light scratches on your induction hob can be a pesky nuisance, but fear not – there are ways to tackle them effectively. When dealing with minor scratches, it’s important to start by using mild cleaners that won’t damage the surface further. Begin by mixing a gentle cleaner with water to create a solution that is safe for use on your hob.
Apply the mixture onto a soft cloth and gently rub it over the scratched area in circular motions. Avoid using abrasive sponges or harsh chemicals, as these can worsen the scratch. Take your time and be patient as you work on buffing out the imperfections.
For stubborn light scratches, consider using a specialized ceramic cooktop cleaner designed specifically for induction hobs. These products are formulated to safely remove minor blemishes without causing any harm to the glass surface. Remember, always follow the manufacturer’s instructions when using any cleaning product on your induction hob.
Using Stronger Cleaners and Techniques for Deep Scratches
When dealing with deep scratches on your induction hob, stronger cleaners and techniques may be necessary to effectively remove them. Start by choosing a cleaner specifically designed for glass or ceramic surfaces, ensuring it is suitable for use on induction hobs.
Apply the cleaner to a soft cloth rather than directly onto the hob to avoid excess product build-up. Gently rub the affected area in a circular motion, focusing on the scratch itself while being careful not to apply too much pressure.
For stubborn deep scratches, consider using a non-abrasive scrubbing pad or even a specialized glass polishing compound. These products can help diminish the appearance of deeper marks over time with consistent application.
Always remember to follow manufacturer instructions and test any new products in a small inconspicuous area before tackling larger scratches. Take your time and be patient as you work towards restoring your induction hob’s surface back to its original shine.
Polishing and Finishing Touches
After addressing the scratches on your induction hob, it’s time to give it a final touch with some polishing. This step will not only help blend in the repaired areas but also leave your hob looking shiny and new.
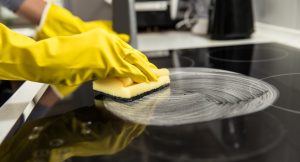
To start, grab a clean microfiber cloth and apply a small amount of ceramic or glass cooktop cleaner to it. Gently rub the cleaner onto the surface in circular motions, focusing on the scratched areas. This will help buff out any remaining marks and bring back that smooth finish.
Once you’ve polished the hob thoroughly, wipe off any excess cleaner with another clean cloth. Make sure there are no streaks left behind for a flawless result. You can also use a specialized ceramic cooktop polish for an extra glossy finish.
Don’t forget to inspect your induction hob under different lighting conditions to ensure all scratches have been effectively minimized. With these finishing touches, your induction hob will look as good as new!
Preventing Future Scratches on Your Induction Hob
To keep your induction hob looking shiny and scratch-free for longer, consider implementing some preventive measures. Start by using cookware with smooth bottoms to avoid scratching the surface. Opt for pots and pans made of materials that are compatible with induction hobs to minimize potential damage.
Another tip is to lift your cookware instead of dragging it across the hob when moving it around. This simple action can significantly reduce the risk of scratches caused by friction between the pan and the glass surface.
Regularly clean your induction hob using gentle cleaners and soft cloths to remove any debris or residue that could potentially cause scratches over time. Avoid using abrasive sponges or harsh chemicals that may harm the glass surface.
Consider investing in protective accessories such as silicone mats or trivets to place between your cookware and the hob during cooking. These additional layers can act as a buffer against accidental scratches while still allowing efficient heat transfer during cooking sessions.
Conclusion
Knowing how to clean scratches off your induction hob is essential for maintaining its appearance and functionality. By following the step-by-step guide outlined in this article, you can effectively remove scratches of varying severity and restore the sleek look of your induction hob. Remember to gather the necessary materials, assess the scratches, use appropriate cleaners and techniques, polish the surface, and take preventive measures for future protection. With proper care and maintenance, your induction hob will continue to shine brightly in your kitchen for years to come.


